Rinse every reservoir, flask and strap after each run, then leave every opening wide and let the parts dry fully before storage. When smell has already set in, a short soak in an oxidising cleaning tablet, such as a denture or percarbonate tablet, clears entrenched odour far better than soap. Drying completely is what actually stops the smell coming back.
TL;DR:
- Rinse every component immediately; if you carry sports drinks, rinse longer and deep clean within 24 hours because residual sugars feed microbes that cause odours.
- Deep clean reservoirs used only for water weekly, but clean them after every sports drink use; sugars linger in narrow tubing and bite valves.
- Persistent tastes or smells call for a soak with a percarbonate or chlorine dioxide tablet, then a thorough rinse; ordinary soap may not break down biofilm.
- Leave caps, valves, and openings unsealed until every part is fully dry; damp, closed gear can develop microbial growth within 24 to 48 hours.
- If a smell or off taste persists after cleaning, inspect the tubing and bite valve, then replace either part if the problem remains.
Table of Contents
- Quick checklist: what to do immediately after every run
- How to clean soft flasks and removable bottles at home
- How to clean reservoirs, tubing and bite valves
- Drying and storage: the decisive step to stop microbes
- Why soap can fail and when to use oxidising cleaners
- Prevention schedule and inspection checklist
- Tips for maintaining material integrity and scent neutrality over time
- Common mistakes we see runners make
- Gear that makes the upkeep simpler
- FAQ
- Sources
Quick checklist: what to do immediately after every run
The routine takes two minutes and prevents most odour problems before they start.
- Empty and rinse the reservoir or soft flask with warm water straight after the run.
- Open caps, bite valves and reservoir seals fully so air can reach every surface.
- Wipe down vest straps and pockets where sweat collects.
- If you carried a sports drink, rinse for longer and plan a full clean within 24 hours.
Sports drinks leave sugars behind that plain water does not, which is why they need the extra rinse time and a faster follow-up clean.
How to clean soft flasks and removable bottles at home
Most odour in a soft flask comes from residue the rinse missed, not the flask itself. A short, consistent process clears it without damaging the plastic.
- Hand-wash with warm water and a mild, biodegradable detergent, using a soft bottle brush to reach the base and seams.
- Rinse thoroughly until no soap taste remains, then shake out excess water.
- Check the manufacturer’s guidance before using a dishwasher; avoid hot cycles unless the flask is stated as dishwasher-safe.
- For a deeper clean, a mild bleach solution works but can leave a taste and shorten the flask’s life, so rinse it out completely afterwards.
- For stubborn smells, a cleaning tablet containing chlorine dioxide or sodium percarbonate lifts odour without scrubbing, a method fire-service field guidance also recommends for hydration reservoirs.
Pro Tip: Fill the flask with warm water and a tablet, then shake it gently instead of scrubbing. The fizzing action does the work for you.
How to clean reservoirs, tubing and bite valves
Tubing and bite valves are where odour tends to hide because they are narrow and hard to reach by hand.
- Use a dedicated reservoir brush for the bladder and a thin tubing brush to clear the inside of the hose.
- Push cleaning solution through the tubing repeatedly until the water runs clear.
- Soak the bite valve separately in the same solution, scrubbing it if it detaches from the tube.
- Prop the reservoir open with a hanger or drying frame so the inside stays exposed to air.
- Replace the tubing or bite valve if odour or an off taste persists after a proper clean.
Pro Tip: A cleaning kit with a reservoir hanger and brush set earns its place in a kit bag. It turns a fiddly job into a five-minute one.
Fire-service hydration guidance also notes that reservoirs used only for water stay cleaner for longer than those used for sports drinks, since sugars left in a bladder feed the organisms that cause bad smells.
Drying and storage: the decisive step to stop microbes
Cleaning removes residue, but drying is what stops the smell returning. Damp, sealed environments let microbes establish within 24 to 48 hours, so a reservoir or flask packed away even slightly wet can smell again within a couple of days.
- Leave every cap, valve and opening unsealed until the inside is completely dry to follow recommended disinfecting equipment end of season practices.
- Use a drying frame or hang the reservoir inside out where the design allows.
- Stand soft flasks upright with the caps off so air moves through them.
- Store everything in a dry, ventilated spot, not a sealed bag, until you are certain it is dry.
- Occasional airing in sunlight helps where the fabric allows it.
Our guide to organising hydration vest storage covers how to set a drying and storage routine that keeps a vest race-ready between runs.
Why soap can fail and when to use oxidising cleaners
A persistent ‘stale’ or ‘plastic’ taste is usually biofilm, a thin layer of organic residue that clings to the inside of tubing and flasks. Ordinary detergent tends to slide across biofilm rather than break it down. Oxidising cleaners, including sodium percarbonate tablets sold for dentures, release oxygen that breaks apart the biofilm’s structure, which is why environmental guidance on mould and biological residue points to oxidising agents as more effective against entrenched residue than soap alone.
Oxidising, oxygen-releasing cleaners disrupt the biofilm matrix in ways that simple detergents cannot.
A short soak, followed by a thorough rinse, clears most odour without leaving a chemical taste behind. Save bleach for occasional deep cleans rather than routine use, since it can taint plastic over time.
Prevention schedule and inspection checklist
A simple cadence keeps odour from building up in the first place.
- Rinse every component after every run, regardless of what you carried.
- Deep-clean weekly if you only ever carry water.
- Deep-clean after every single use when you carry sports drinks.
- Inspect for a lingering taste or smell after cleaning, visible residue, or a damaged bite valve.
Pro Tip: Keep a spare bite valve and a short length of tubing in your kit bag. Swapping a worn part is quicker than fighting a smell that keeps coming back.
Replace bite valves and tubing sooner if you use sports drinks often, since sugars collect in narrow sections that brushes cannot always reach.
Tips for maintaining material integrity and scent neutrality over time
Keeping a vest smelling clean long-term is less about one deep clean and more about protecting the materials that hold odour. Fabric straps and foam padding absorb sweat and salt, and hot washes or tumble drying can break down that padding faster than normal wear would. Hand-washing straps and foam panels, then line-drying them, keeps the fit and feel intact for longer, a point our guide to washing a hydration vest covers in more detail.
Rotating between two soft flasks, rather than relying on one, gives each one proper time to dry fully between runs. Rinsing straps and pockets even on days you skip a full wash stops sweat salts building up, since those salts can hold moisture against the fabric and encourage odour over time.

Avoid storing a vest in a kit bag straight after a humid run, even briefly. A short airing before the bag goes away, even five minutes on a hook, makes a measurable difference to how the vest smells the next time you reach for it.
Common mistakes we see runners make
The same few habits cause most of the smell complaints we hear about: packing a vest away damp after a race, leaving a clean-up for “next time,” and throwing straps and foam into a hot machine wash to save time. Each one is an easy fix once you know it matters. Our guide on washing a hydration vest without wrecking straps or foam walks through the gentler approach that keeps both fit and smell under control.
— martin
Gear that makes the upkeep simpler
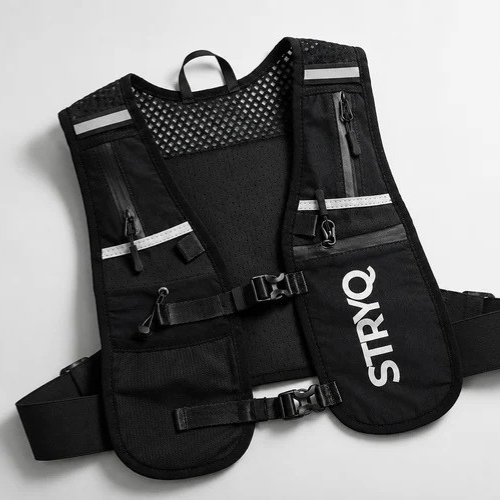
A vest and flask designed with cleaning in mind save you most of the hassle described above. Our STRYQ HYDRATION RUNNING VEST uses wide-opening pockets and adjustable straps that are easy to rinse and air out fully between runs, and removable flasks mean you are never cleaning around fixed tubing.

- The STRYQ Green 500ml Hydration Vest Bottle and STRYQ Pink 500ml Running Soft Flask detach fully for easy hand-washing and quick drying.
- Durable materials across our running gear range hold up to regular washing without losing shape or grip.
- Our full range of running soft flasks is priced at £14 one-off, making it easy to keep a spare on rotation while one dries.
Browse the STRYQ HYDRATION RUNNING VEST, priced at £42 one-off, to see the features for yourself.
FAQ
Can I put my vest in the washing machine?
Hand-washing is the safer option for most hydration vests, since machine cycles and tumble drying can break down straps and foam padding over time. If you do machine wash, use a cold, gentle cycle and skip the dryer, air-drying instead.
Why is my running vest rubbing on my neck?
Rubbing usually points to a strap that is sitting too loose or too tight rather than a sizing problem. Our guide to a no-bounce vest fit covers adjustment steps that fix chafing in most cases.
What does a hydration vest do?
A hydration vest carries water or a sports drink close to the body in a soft flask or reservoir, letting you drink without stopping or carrying a bottle by hand. Our overview of whether hydration vests are worth it explains who benefits most from one.
What is the best running hydration vest for men?
The right vest depends on your typical distance, how much you need to carry and how it fits across the chest and shoulders. Our STRYQ HYDRATION RUNNING VEST is built with adjustable straps and multiple pockets for runners who want a secure, practical fit without a high price.
How often should I deep-clean my hydration reservoir?
Deep-clean weekly if you only ever carry water, or after every single use when you carry sports drinks, since sugars left behind feed the organisms that cause odour, as fire-service hydration guidance outlines. A persistent smell after cleaning is a sign to check tubing and bite valves for residue.
Sources
- Wildland Firefighter Health and Safety Report No. 11: Page 5
- NPIC: Mold information
- A Brief Guide to Mold, Moisture, and Your Home September 2012